
In this section, we’ll look at how to move entire rows of data and insert new ones. The example below is data from a pump manufacturer for each of their different pump sizes. Ultimately, we may want to use this data for a lookup table.
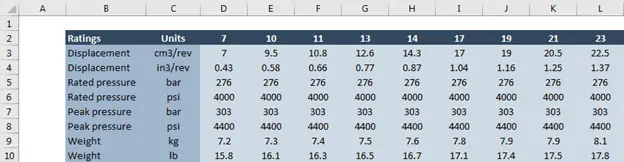
Each column is a different size of pump (7, 10, etc.). The rows contain data in both English and metric units. Let’s say we want to arrange the data so that the values in English units are on top and the ones in metric are below. We can do that by moving an entire row of the worksheet. Click on the row number on the left side of the sheet to the select the row. Cut the row with Ctrl-X. For this example, we’ll cut row 6 (rated pressure in psi) and move it below row 4 (displacement in in3/rev).
In order to insert the row you’ve just cut below row 4, you have to right-click on row 5. Excel always inserts rows above the current row, and columns to the left of the current column. Right-click on row 5 (the row number on the left side) and choose Insert Cut Cells.
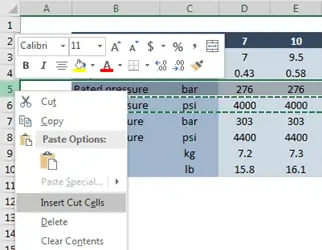
This will make your cut cells the new row 5, and move the old row 5 down.

Elevate Your Engineering With Excel
Advance in Excel with engineering-focused training that equips you with the skills to streamline projects and accelerate your career.
Sometimes, you may not want to move the entire row – for example, if there’s another data table to the right of this one that you don’t want to interfere with. In that case, select only the cells that you want to move. Cut the cells with Ctrl-X, and right-click where you want to insert it. Remember if you want to insert below row 6, you’ll right-click on the first cell of row 7 that has data in it. Select Insert Cut Cells.
What if you need to add a row to the middle of your table? Next, we’ll add a new row to calculate the flow rate in gallons per minute. To do that, we’ll need to create a blank row. There are a few ways to do this:
- Select all the cells below the place where the new row will be (the entire bottom of the data table). Click within the selected area and drag the cells down one row. This method loses the formatting (colors, etc.), so it’s not ideal for this table.
- Right-click on the row number on the left side and select Insert. This inserts a row all the way across the worksheet, preserving the formatting of the table. However, if you have other data tables on the same worksheet, it will add a blank row in those as well.
- Select the cells that are in the row right below where the new row will be. Right-click and choose Insert. A box will pop up asking which direction to shift the existing cells.
Excel will guess which direction you want to shift the cells. In this case, we’ll shift them down. Click OK. This will insert a new row below row 3 with the same formatting as the rest of the table.
You can now enter in a formula to calculate the flow rate at 2000 RPM in gallons per minute.
You can drag the fill handle to the right to fill that formula into the rest of the row.