
If you’re like me, you’ve probably spent hours tinkering with Microsoft Excel to solve complex engineering problems, longing for ways to make your workflow smoother and more efficient. Today, I’m going to give you a glimpse into how to create a Moody Chart Calculator in Excel.
This tool is a leap towards precision and efficiency in determining the friction factor in fluid flow through pipes. Think about it: no more manual plotting or second-guessing your intersection points on the Moody chart.
With the power of Excel, we’ll automate this process, making your calculations faster, more accurate, and, frankly, more enjoyable.
What is a Moody Chart and Why Use it?
The Moody chart serves as a graphical representation of the Darcy-Weisbach friction factor in turbulent flow as a function of Reynolds number and the relative roughness of the pipe. It’s a cornerstone in the field of fluid mechanics, used to predict pressure drops in pipe systems.
Traditionally, using the Moody chart required manually finding the intersection point on the graph. However, with Excel, you can automate this process, ensuring accuracy and saving time.

Elevate Your Engineering With Excel
Advance in Excel with engineering-focused training that equips you with the skills to streamline projects and accelerate your career.
Creating Automated Calculations for the Friction Factor
The foundation of the Moody chart calculator in Excel lies in automating the calculation of the friction factor. This involves understanding and implementing the Colebrook-White equation, an implicit equation used to solve for the friction factor in turbulent flow regimes.
To automate this process, you can use Excel’s Visual Basic for Applications (VBA) to create a custom function that numerically solves the Colebrook-White equation.
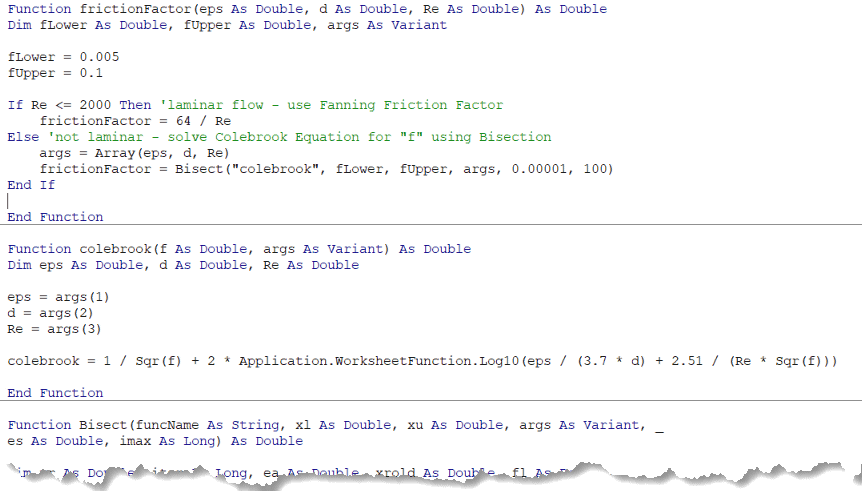
This function takes the Reynolds number and the relative roughness as inputs and returns the friction factor. By integrating this function into your spreadsheet, you can automatically calculate the friction factor based on user inputs for pipe diameter, roughness, flow rate, and fluid properties.
Inputting and Managing Data
Effective data input and management are crucial for the Moody chart calculator’s usability and accuracy. Engineers can input parameters such as internal pipe diameter, flow rate, pipe roughness, and fluid properties. Excel’s data validation features can be used to ensure that inputs are in the correct units.
Furthermore, converting units within Excel ensures consistency, especially when dealing with various units of measurement. The `CONVERT` function in Excel is particularly handy for this:
=CONVERT(value, “from_unit”, “to_unit”)
By using this function, you can seamlessly convert units of diameter, roughness, and flow rate to a consistent set, which is crucial for accurate calculations.
Visualizing Results on the Moody Chart
One of the most powerful features of the Moody chart calculator in Excel is the ability to dynamically visualize the results on a custom-charted Moody diagram. To achieve this, you can plot the friction factor against the Reynolds number for different roughness values.
First, prepare your data by calculating a range of friction factors for a series of Reynolds numbers and relative roughness values. Then, using Excel’s charting tools, create a scatter plot with smooth lines to represent the Moody chart’s curves.
To highlight the specific calculation result, add a data series that plots only the calculated friction factor and Reynolds number. Customize this point with a different color or marker style to make it stand out.

You can further enhance the user experience by adding interactive elements, such as data callouts that display the exact friction factor value at the highlighted point. This gives users immediate, visual confirmation of their results, making the tool not only functional but also intuitive to use.
Leveraging Excel Features for Enhanced Usability
To make the Moody chart calculator more user-friendly and adaptable, leverage other Excel features such as dynamic tables for fluid properties and dropdown menus for unit selection. This allows users to easily switch between different fluids or units, seeing the results update in real-time.
Creating a table of fluid properties can be as simple as:
=VLOOKUP(fluid_name, fluid_properties_table, property_column, FALSE)
This formula can automatically retrieve the kinematic viscosity and density of the selected fluid, ensuring that calculations are based on accurate data.
Elevate Your Engineering Skills
This blog post has introduced you to the valuable concept of a Moody Chart calculator, a tool based on a new engineering spreadsheet that’s now available inside EngineerExcel Academy. As a member, you have free access to this spreadsheet among many others, offering you an opportunity to further enhance your engineering and Excel skills.
To learn more and join, visit https://engineerexcel.com/enroll-academy/, and take the next step in elevating your engineering toolkit.