
Excel provides another way to ensure input values meet certain criteria other than data validation: form controls like combo boxes, list boxes, and radio buttons. To add form controls, we have to enable the Developer tab, because it’s not turned on by default when you install Excel. Go to File > Options > Customize Ribbon. Click the check box next to Developer on the right side of the window.
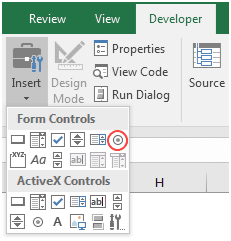
The first form control we’ll look at is a Combo Box. Open Worksheet 05f. In the Developer tab’s Controls section, select Insert. Click the second icon:

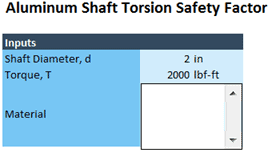
When you hover your mouse over the spreadsheet, the cursor will turn into thin crosshairs. You can use this to create a box. Click and drag to create a rectangle for the Material. When you release the mouse button it will turn into a combo box that looks like an input you’d see in a regular application:
Using this kind of box will be intuitive to someone who uses this spreadsheet – they’ll know that there is something to select from a list. To set it up, right-click on it, and select Format Control. Click within the Input range and select the list of alloys. Linking a cell to the combo box allows us to send a number that corresponds to the position of the alloy to a cell. In this case, we’ll be sending a number from 1 to 9.
The spreadsheet contains a cell to send that value to, the “Material number” in cell C14. Set the Cell link to cell C14:

Elevate Your Engineering With Excel
Advance in Excel with engineering-focused training that equips you with the skills to streamline projects and accelerate your career.
Click OK. To see the drop-down list, click elsewhere in the sheet, then click the combo box again. If you select 356, the value returned for the material number is 2, because 356 is the second value in the list.
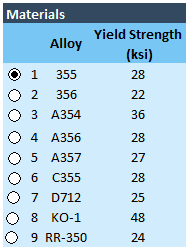
The spreadsheet contains a column (column F) to add the numbers 1-9 beside the alloys. Add those numbers so that we can create a lookup function that can extract the yield strength based on the material number. If you like, you can just enter in the first two numbers, select them, and then drag the fill handle down. Excel will fill in the rest.
Next, we’ll create the lookup function for yield strength in cell C15. Begin the formula with:
=VLOOKUP(
This time, rather than looking up the name of the alloy, we’ll reference the material number in cell C14. The second argument is the entire lookup table (F7:H15), including the numbers that you added in. The column containing the yield strength is the third column, so use a 3 for the next argument. The final argument should be FALSE so that it searches for an exact match.
=VLOOKUP(C14,F7:H15,3,FALSE)
Finally, you’ll have to multiple the value that is returned to convert from ksi, or thousands of pounds per square inch to just pounds per square inch.
=VLOOKUP(C14,F7:H15,3,FALSE)*1000
Next, calculate the safety factor in cell K5 as the stress divided by the yield strength:
=C13/C15
Now, you can go into the Combo box, select any value, and the calculations will automatically update.
Another type of form control is a List Box. Open Worksheet 05g. To add a List Box, go to Developer > Insert, and choose the fifth icon:

A List Box takes up a bit more space on your spreadsheet, but it works similarly to a combo box. Click and drag to create a box beside Material.
Right-click on the box and select Format Control. Again, the input range will be the list of alloys, and the cell link will be the input for Material Number (C17 on this sheet). Leave the selection type as single, so that only one alloy can be selected at a time.
Click OK and the list will populate with the list of alloys. Click elsewhere on the spreadsheet, then choose one of the values. It will return the material number to the cell link.
To complete the worksheet, repeat the same steps as you did with the combo box. Add the numbers 1-9 to the table. Then, create the VLOOKUP formula:
=VLOOKUP(C17,F7:H15,3,FALSE)*1000
Next, calculate the safety factor:
=C16/C18
The third and final type of form control that will be discussed here is the Radio Button. Radio buttons are the familiar round buttons which turn black in the center when you click on them. They’re often found on forms. Open Worksheet 05h. Go to Developer > Insert, and select the radio button icon in the upper right.
To add a radio button, click and drag beside the first alloy. Right-click on it and choose Format Control. Radio buttons don’t have any input cells, only a cell link. Select the cell next to material number and click OK.
The radio button will have an unnecessary caption. Hover your cursor over the caption (it begins with “Option”) until your cursor becomes a text cursor like this: Click and delete the text. You may want to drag the right border of the box containing the text out so you can see all of the text.
Right-click the radio button and select Copy. Paste the button beside the remaining alloys with Ctrl-V.
When you click on a button, the number in the linked cell will correspond to the number of the button that was clicked. It’s important to note that the number of the button is determined by the order in which it was added, not the number that’s next to it in the spreadsheet. This means you must add these buttons in sequence for them to work correctly.
Again, you can finish the spreadsheet up with the VLOOKUP function:
=VLOOKUP(C13,G7:I15,3,FALSE)*1000
This worksheet already contains the safety factor calculation, so this sheet is now complete.