
Excel has built-in tools that are very useful for troubleshooting formulas, even if the formulas are complex.
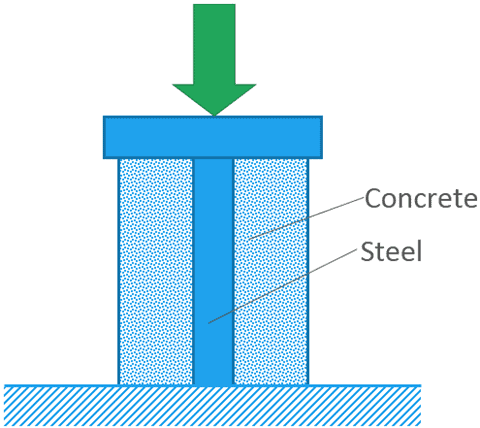
The example spreadsheet shown throughout this post calculates the force in the components of a structure made of a steel bar encased in concrete. There is a uniform load applied across the top:

Elevate Your Engineering With Excel
Advance in Excel with engineering-focused training that equips you with the skills to streamline projects and accelerate your career.
This kind of structure is statically indeterminate, so the spreadsheet uses the consistent deformation method to calculate the forces in the steel and concrete parts.
However, it’s generating divide by zero errors:
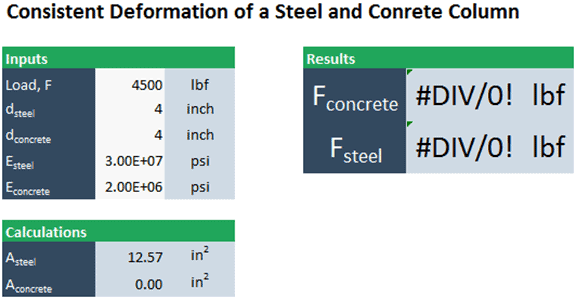
Although you could go through this calculation manually to find the source of the errors, I’ll demonstrate here how to use Excel’s troubleshooting tools.
All the troubleshooting tools are in the Formula Auditing section of the Formula tab.
Troubleshooting Excel Formulas with Trace Precedents
The first method is to trace the cell’s inputs using Trace Precedents. It’s possible that one of these cells is causing the error. We can select the first cell with the #DIV/0! error and click Trace Precedents in the Formulas tab. Excel will draw arrows to the cells that are inputs:
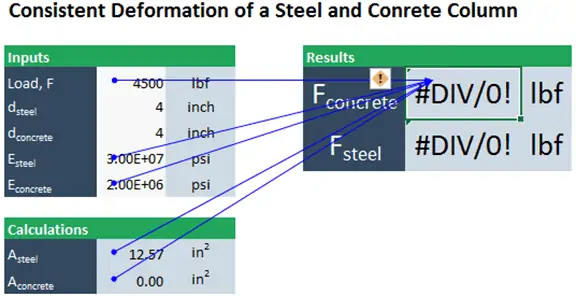
One of these cells is actually zero, so there’s a good chance that cell is actually causing the divide by zero error.
We can double-click on the cell with the error to examine the formula.
The term for the area of the concrete is in the denominator.
So why is Aconcrete zero?
We can follow the clues further. First, I’ll click Remove Arrows to clear this set of arrows. Then I click the cell containing the zero for Aconcrete and click Trace Precedents:
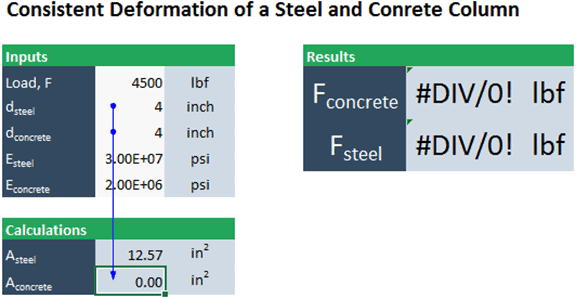
The area of the concrete section is a function of the steel diameter and the concrete diameter.
If I double-click on that cell to examine the formula, we can see that the formula subtracts the square of dsteel from the square of dconcrete.
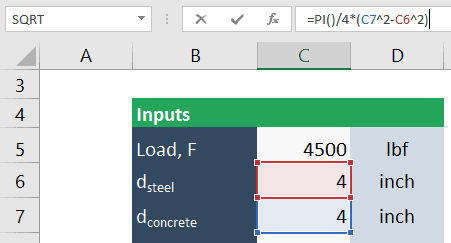
The diagram makes it obvious that the diameter of concrete must be greater than the diameter of steel, otherwise there isn’t any concrete. Of course, we could fix this error by entering a dconcrete greater than dsteel.
Checking Excel Formulas with “Evaluate Formula”
There is another method to evaluate the source of errors in Excel called Evaluate Formula. This method works well for complex, nested formulas and ones that contain logical tests. It allows you to go through a formula, step-by-step, seeing what each part of the formula evaluates to.
First, I select the first cell containing the #DIV/0! Error.
Then, in the Formula tab, I select Evaluate Formula from the Formula Auditing section. The Evaluate Formula window appears:
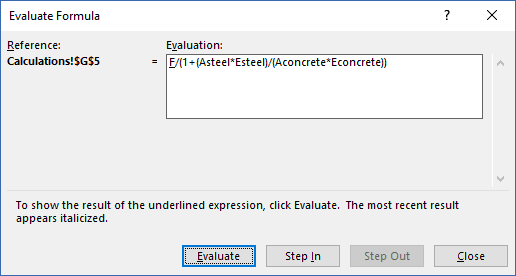
The part of the formula that will be calculated when I click Evaluate is underlined.
If there’s a cell reference, it will insert the value of that reference. If it’s a calculation, it will perform that calculation.
After evaluating the first part, the second will be evaluated, and so on. By going through the formula step-by-step, it makes it easy to identify which part caused the error.
When you click Evaluate, Excel will replace F with the value from the spreadsheet:

Now the variable Asteel is underlined, telling us which value will be evaluated the next time we click Evaluate. Click Evaluate twice, and it will retrieve the values for both Asteel and Esteel.

Now that it has those two variables, the entire term is underlined. Click Evaluate again, and it will perform that multiplication. Click Evaluate again and it will move on to the terms in the denominator.

When Aconcrete is evaluated, it shows that variable is zero. Click Evaluate two more times to calculate the entire denominator. Click it once more to evaluate the division. This will generate the divide by zero error:

If we continue to click Evaluate, the error will propagate through the calculation.
Wrap Up
The Evaluate Formula window and the tracer arrows are great tools that can be used to help you find the reason for an error. Unfortunately, anyone who uses this spreadsheet can still enter values that could potentially result in an error. To prevent this, we would have to add data validation.
