
In my last post, I started demonstrating how to use advanced Excel features to make a simple engineering application that calculates mass moment of inertia of four basic shapes in Excel. I started by using radio buttons to allow a spreadsheet user to select the basic shape for which they would like to calculate moment of inertia. Today, I’m going to continue building that spreadsheet application by adding an input section with the intelligence to determine what inputs are required based on the shape chosen. This should be a good demonstration of what can be done with conditional formatting to create flexible engineering spreadsheets.

Inputs
In addition to their mass, each of the shapes has a particular set of dimensions that define them.
The solid cylinder is defined by:

Elevate Your Engineering With Excel
Advance in Excel with engineering-focused training that equips you with the skills to streamline projects and accelerate your career.
- Outer Radius, ro
- Length, L
The hollow cylinder is defined by:
- Outer radius, ro
- Inner Radius, ri
- Length, L
The thin disk is defined by outer radius, ro, only.
The block is defined by lengths a, b, and c.

I need to create input cells for each of these values in the spreadsheet.
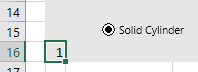
To do this, I first dragged the radio button output cell from E20 to B16, just to clean up the spreadsheet a little.
Then, I created input cells for each of the dimensions above.

Conditional Formatting
Of course, not all of these dimensions are necessary for each of the shapes. I plan to set the spreadsheet up so that having unnecessary values in cells will not cause errors. However, I don’t want a future user to be confused either.
To indicate that an input is not necessary, I will use conditional formatting to “gray out” a cell based on the radio button that is chosen.
For example, if a user of this spreadsheet selects “solid cylinder”, I want the input cells for dimensions ri, a, b, and c to turn to gray. I can use the value in B16 to do this.
First, I selected the input cell for ri. Then I opened the Conditional Formatting menu and chose “New Rule”. In the “Edit Formatting Rule” dialog, I chose “Use a formula to determine which cells to format.” Next, in the formula box, I typed the equation =B16=1.
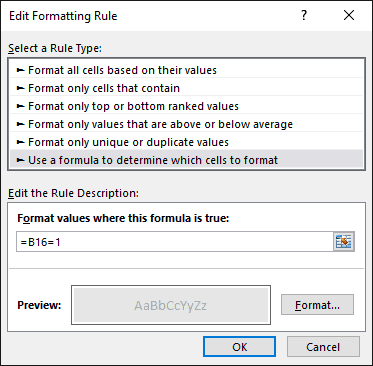
Finally, I clicked “Format” to choose a light gray fill and gray text to give the cell a “grayed-out” appearance.
I repeated this for the remaining input cells that were unnecessary for the solid cylinder moment of inertia calculation (dimensions a, b, and c).
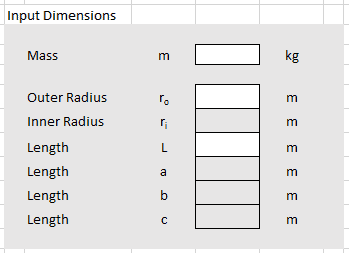
So now, when the “solid cylinder” radio button is selected, the input boxes for ri, a, b, and c are grayed out as shown below. Numbers can still be entered in these cells but are not necessary for the calculation. Nor will they affect the final result.
I used the same process to gray out other input cells as the value of cell B16 changed.
- a, b, and c when B16 = 2.
- ri, L, a, b, and c when B16 = 3.
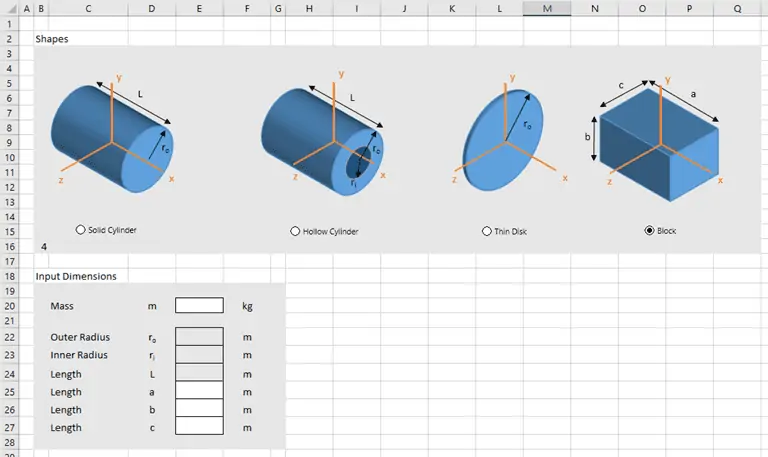
- ri, ro, and L when B16 = 4.
For example, when I select the radio button for the block, the value of B16 changes to 4 and the first three input boxes are gray:
Up Next…
With the input cells working properly, I can move on to calculating and reporting out the moments of inertia. I’ll cover exactly that in the final post of this series.
Until then, try using conditional formatting to make your spreadsheets more intuitive.