

If you’ve ever ventured into the Excel Solver add-in, you probably noticed that there are many options and it can be a little overwhelming. In this post, I’d like to provide some practical information to help you choose the correct solving method in Excel to efficiently find an optimum solution to your problem.
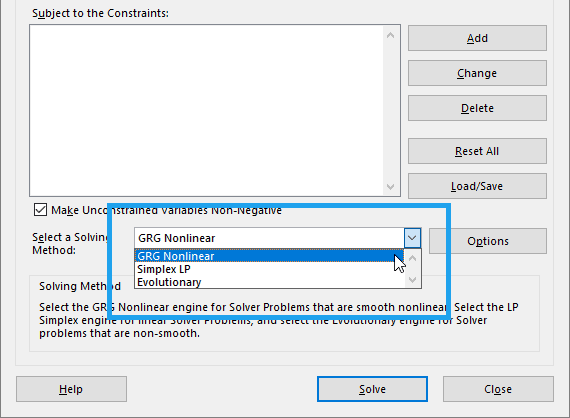
One of the things you must choose when you are setting up Solver in Excel is the solving method. There are three methods or algorithms to choose from:
- GRG Nonlinear
- Evolutionary
- Simplex LP
GRG Nonlinear and Evolutionary are best for nonlinear problems, while Simplex LP is limited only to linear problems.

Elevate Your Engineering With Excel
Advance in Excel with engineering-focused training that equips you with the skills to streamline projects and accelerate your career.
GRG Nonlinear
GRG stands for “Generalized Reduced Gradient”. In its most basic form, this solver method looks at the gradient or slope of the objective function as the input values (or decision variables) change and determines that it has reached an optimum solution when the partial derivatives equal zero.
Of the two nonlinear solving methods, GRG Nonlinear is the fastest. That speed comes with a compromise though.
The downside is that the solution you obtain with this algorithm is highly dependent on the initial conditions and may not be the global optimum solution. The solver will most likely stop at the local optimum value nearest to the initial conditions, giving you a solution that may or may not be optimized globally.
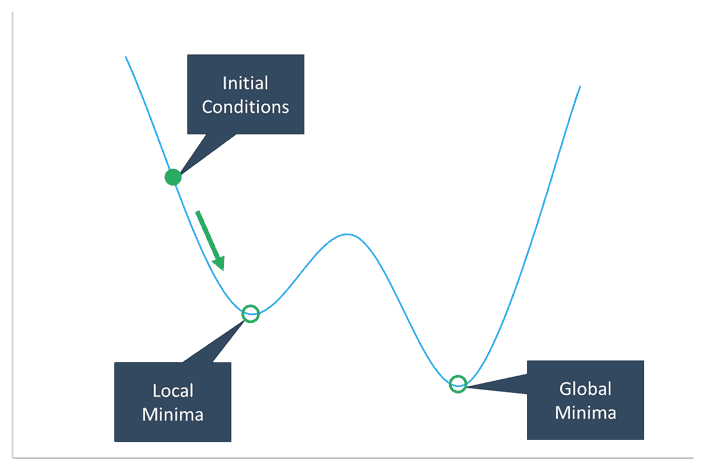
Another requirement for the GRG nonlinear solver to obtain a good solution is for the function to be smooth. Any discontinuities caused by IF, VLOOKUP, or ABS functions, for example, will cause problems for this algorithm.
Evolutionary
The Evolutionary algorithm is more robust than GRG Nonlinear because it is more likely to find a globally optimum solution. However, this solver method is also VERY slow.
Let me explain why:
The Evolutionary method is based on the Theory of Natural Selection – which works well in this case because the optimum outcome has been defined beforehand.
In simple terms, the solver starts with a random “population” of sets of input values. These sets of input values are plugged into the model and the results are evaluated relative to the target value.
The sets of input values that result in a solution that’s closest to the target value are selected to create a second population of “offspring”. The offspring are a “mutation” of that best set of input values from the first population.
The second population is then evaluated and a winner is chosen to create the third population.
The diagram below hopefully makes it more clear.
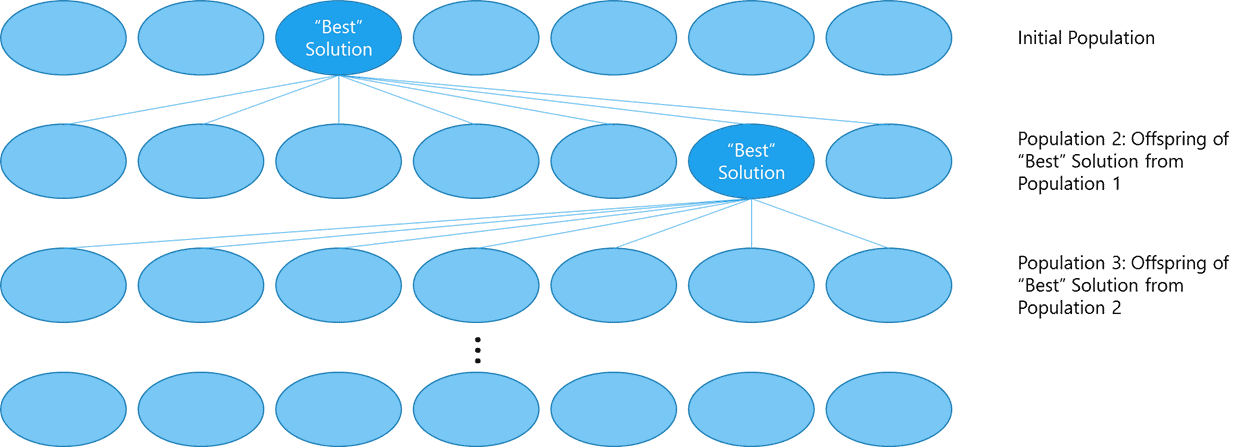
This goes on until there is very little change in the objective function from one population to the next.
What makes this process so time-consuming is that each member of the population must be evaluated individually. Also, subsequent “generations” are populated randomly instead of using derivatives and the slope of the objective function to find the next best set of values.
Now Excel gives you some control over the algorithm through the Solver options window. For instance, you can choose the Mutation Rate and Population Size to potentially shorten the solution.
However, this has diminishing returns because reducing the population size and/or increasing the mutation rate may require even more populations to achieve convergence.
GRG Multistart
A nice compromise between the speed of the GRG Nonlinear algorithm and the robustness of the Evolutionary algorithm is GRG Nonlinear Multistart. You can enable this option through the Solver Options window, under the GRG Nonlinear tab.
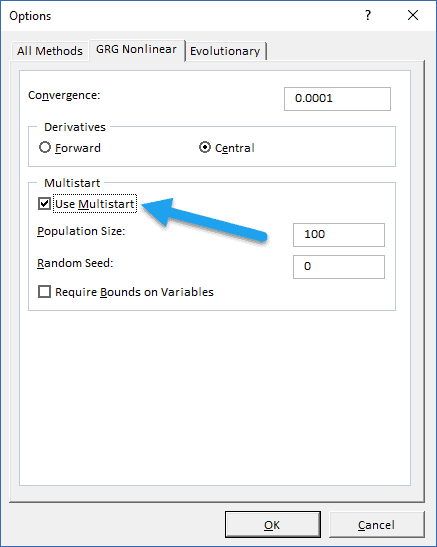
The algorithm creates a randomly distributed population of initial values that are each evaluated using the traditional GRG Nonlinear algorithm.
By starting multiple times from different initial conditions, there is a much greater chance that the solution found is the global optimum.
Simplex LP
Of the three solving methods, I use Simplex LP the least. It’s limited in its application because it can be applied to problems containing linear functions only.
Many times, the problems I’m solving are nonlinear. And when they are linear, I prefer to solve them as a matrix equation instead.
However, it is very robust, because if the problem you are solving is linear you can be assured that the solution obtained by the Simplex LP method is always a globally optimum solution.